329

I have been writing programs for my Raspberry Pi (running Raspbian) for a few weeks now and would like to make sure I protect the work I have done.

How can I backup the files I have created?

Can I simply plug the SD card into my Windows (XP or 7) PC and copy it either to the hard drive or another SD card?

Steve Robillard
  • 34,478
  • 17
  • 103
  • 109
  • Is your pc running linux? – Jivings Jun 14 '12 at 18:35
  • 6
    I have PC's running both Ubuntu and Windows (XP & 7), but I would expect most people to be interested in the Windows answer. I will edit the question to make that clear. – Steve Robillard Jun 14 '12 at 18:38
  • 7
    rsync from Raspi to your pc? – Alex L Jun 14 '12 at 18:54
  • 44
    For code, you may also want to consider using [distributed version control software](http://en.wikipedia.org/wiki/Distributed_revision_control) like `git` or `hg`, that way you not only have copies of your code in multiple places, but also have the complete history of how that code has changed. – Mark Booth Jun 15 '12 at 11:01
  • I've used ext2 filesystems on Windows with no trouble at all (ran Visual Studio off it) using [Ext2IFS](http://www.fs-driver.org/). I don't know about the state of ext3/ext4 support (haven't tried [ext2fsd](http://sourceforge.net/projects/ext2fsd/)). – reinierpost Feb 28 '13 at 15:37
  • Xbian has the (command-line but also GUI) ability to create a backup. This one is accessible via a network share. Very easy :) – M. Mimpen Mar 12 '14 at 11:59
  • @MarkBooth "May want to consider" is putting it rather lightly, isn't it now? – Steven Lu Apr 13 '14 at 04:06
  • 4
    @MarkBooth I don't see why a DVCS is needed over a VCS if we are just considering being able to retrieve code later. Heck, it's even easier since you use revision numbers not commit hashes to identify a particular state. Learning a CVCS like Subversion isn't much of a time investment (as I recall... though it was a very, very long time ago). Yes, switching to Git was a bit unnerving at the time, but I have never ever looked back. – Steven Lu Apr 13 '14 at 21:17
  • 1
    Comments are not a good place for this kind of discussion @StevenLu, we should take this to [chat]. – Mark Booth Apr 13 '14 at 22:38
  • Have you looked at Win32DiskImager? It is short and sweet. Makes an ..img file that is an exact clone of the original. – SDsolar May 03 '17 at 03:52

18 Answers18

316

If you want to preserve all of the data, you will probably have to create a disk image. Furthermore, Windows cannot recognize typical Linux filesystems, so you probably won't even be able to see your files, when you plug in your SD card.

Creating a disk image will preserve not only files but also the filesystem structure and when you decide to flash your new SD card, you will be able to just plug it in and it will work.

Linux

On Linux, you can use the standard `dd` tool:
dd if=/dev/sdx of=/path/to/image bs=1M

Where /dev/sdx is your SD card.

Note: An of image created from a mounted partition on if may be corrupted. This risk is due to the fact that changes made to if may be incomplete when copied by dd. To avoid risk, the if should be un-mounted during dd.

Mac

On Mac, you can also use the standard `dd` tool with a slightly different syntax:
dd if=/dev/rdiskx of=/path/to/image bs=1m

Where /dev/rdiskx is your SD card.

(using rdisk is preferable as its the raw device - quicker)

To find out which disk your device is type diskutil list at a command prompt - also, you may need to be root; to do this type sudo -s and enter your password when prompted.

Windows

Option 1

On Windows, you can use the reverse process that you used when flashing the SD card.

You can use Win32 Disk Imager, which is the preferred tool for flashing a SD card of the Foundation. Just enter the filename (the location and name of the backup image file to be saved), select the device (the SD card) and press read:
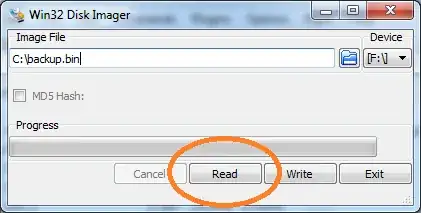
Win32 Disk Imager

Of course, you can also use RawWrite, dd for Windows or similar tools, the process is quite similar.

Option 2

If you don't want to back up your entire system, but only specific files, I suggest you connect to your Raspberry Pi via SFTP and copy the files to your local computer (You can use the WinScp client). If you have SSH enabled, SFTP usually requires no special configuration on the Raspberry Pi side.

Another option is to copy the files to a remote system using rsync.

You can also install special drivers so your Windows can read ext filesystems (and will thus be able to read the whole SD card), such as ext2fsd but it is probably not worth the effort.


Since the image will be of the same size as your SD card, you may want to compress it. This can be achieved simply by using your favorite compression tool, such as gzip, 7zip, WinZip, WinRar ...

Seamus
  • 20,552
  • 3
  • 31
  • 67
  • 1
    +1 in general, although `rsync` via `ssh` would probably be easier. Also, for source code - as [Mark Booth already stated](http://raspberrypi.stackexchange.com/questions/311/how-do-i-backup-my-raspberry-pi#comment539_311) - you should absolutely use a [DVCS](http://en.wikipedia.org/wiki/Distributed_revision_control) – Tobias Kienzler Dec 13 '12 at 16:54
  • 1
    If my SD card became corrupted, how would I install this image to a new SD card? – Flipper Feb 03 '13 at 08:57
  • 2
    Your link to Win32 Disk Imager comes up with no downloads available. I assume it's the same as http://sourceforge.net/projects/win32diskimager/ ? – Yamikuronue Feb 14 '13 at 01:03
  • @Yamikuronue Yes. The page in the answer has a link to the sourceforge page you specified. – Cristian Diaconescu May 06 '13 at 16:34
  • 2
    oh my, I can't distinguish if "read" in that picture means "read the image file" or "read the PARTITION AND WRITE IT INTO the image file".... same for "write"... That gui needs to be sanitized. Something like "Image -> Device" and "Device -> Image" (or a better alternative) – Olivier Dulac Dec 05 '13 at 18:43
  • 1
    When I use WinDiskImager, I get an image that is the size of the storage partition - the boot partition appears to be missing. Have you tried writing the image onto a new SD card? I don't have a second one with which to test at the moment. – me-- Jan 03 '14 at 03:46
  • It would be useful to include compression with dd this way the image is not the same size as the original. gzip works great with dd. – haziz Feb 14 '14 at 13:58
  • @me-- I get the same issue - I only see a RAW partition of the SD card that is only 1.2 GB despite the SD card being 8 GB. I had to assign it a drive letter and the images are only 1.2 GB, i.e. not the full disk. – deed02392 Jun 15 '14 at 14:10
  • 1
    @Flipper to restore an image just reverse the arguments. On Mac OSX you may need to unmount the SD disk using disk utility first. – rmp251 Jan 24 '15 at 21:36
  • 4
    Win32DiskImager seems to only be able to deal with partitions Windows recognizes. I've had little to no luck with it cloning Noobs/Raspbian SD cards. Found this freeware program: http://hddguru.com/software/HDD-Raw-Copy-Tool/. It works like a charm to do a byte-by-byte clone of the SD card in Windows (I used it with Win7 64-bit), regardless of partitioning scheme and contents. – techie007 Feb 03 '15 at 16:37
  • In the output section of, do you type [back up name].img – Iancovici Mar 21 '15 at 20:01
  • to copy the image to the fresh sdcard on OSX, I had to unmount the card using the OSX disk utility program. – DanT Jan 15 '16 at 16:35
  • Great tip, thanks. Any pointers in creating an image file from say a 16GB SD card that is only using a tiny portion? For example, my Pi has been 'expanded' to use the fill size (16GB) but the original Raspian image would fit on a 4GB card. I'd like to be able to burn the image onto a smaller SD card ideally. – Toby Mar 23 '17 at 20:27
  • 1
    Don't forget to shrink the image before writing it to the SD card. Practically no SD cards are of the same size! See https://github.com/Drewsif/PiShrink – László Monda Mar 27 '18 at 10:04
  • I also had to unmount the sd card using diskutility on MacOS, but I still couldn't write to the disk (permission denied). I removed and re-inserted it, and then was able to unmount it and write to it via dd. – MidnightJava Aug 04 '18 at 15:15
  • I prefer `ddrescue` over `dd`, as it guarantees successful copy by retrying sectors if needed. I've written about my preferred process & steps here: https://www.electricrcaircraftguy.com/2018/01/how-to-clone-your-hard-drive.html. – Gabriel Staples Nov 24 '18 at 01:00
  • How do I backup all the partitions of a Rpi (boot and root) to a single image file so that later when I use Win32DiskImager or balenaEtcher, both partitions are restored? Currently when using Win32DiskImager requires to select the partition (boot or root) and won't do both in a single image. – Zythyr Jul 26 '19 at 00:02
  • What if the sdcard has multiple partitions? – CraigDavid May 13 '20 at 20:58
  • You could run `ssh @ "sudo -S dd if=/dev/mmcblk0 bs=512 count=$(blockdev –getsize64 /dev/mmcblk0) | gzip -" | dd of=~/Desktop/pi.img` if you want to backup it via SSH during run time. The -S parameter is used because you need the sudo permissions on the raspberry pi for dd and blockdev. With getsize64 you get getsize * 512. The count parameter will truncate or shrink the img file to only use the allocated space. if you skip count you should get an whole image with `ssh @ "sudo -S dd if=/dev/mmcblk0 bs=512 | gzip -" | dd of=~/Desktop/pi.img` – Micha93 Feb 05 '21 at 07:56
  • Oh, maybe there are a better solution. Because we need the `sudo -S` command twice. If not, he tries to read `$(blockdev --getsize64 /dev/mmcblk0)` from your local device. So you could try it with: `ssh @ "sudo -S dd if=/dev/mmcblk0 bs=512 count=\$(sudo -S blockdev –getsize64 /dev/mmcblk0) | gzip -" | dd of=~/Desktop/pi.img`. Then you have to enter the password twice. – Micha93 Feb 05 '21 at 08:47
  • and of course without `| gzip -`... Not my day! – Micha93 Feb 05 '21 at 09:39
170

If you are running Linux then you can use the dd command to make a full backup of the image:

dd if=/dev/sdx of=/path/to/image

or for compression:

dd if=/dev/sdx | gzip > /path/to/image.gz

Where sdx is your SD card.

To restore the backup, you reverse the commands:

dd if=/path/to/image of=/dev/sdx

or when compressed:

gzip -dc /path/to/image.gz | dd of=/dev/sdx
Peter Mortensen
  • 2,014
  • 2
  • 15
  • 17
Jivings
  • 22,458
  • 11
  • 89
  • 139
  • 3
    I highly recommend using gzip - I have backed up some desktop partitions today and a 20Gb partition was saved in 8.9Gb. – Alex Chamberlain Jul 04 '12 at 15:48
  • 2
    bzip2 should compress even better, and is available on all Linux systems. On newer Linux systems xz should compress even better.The decompressors for these are bunzip2 and unxz respectively. – Arne May 29 '13 at 12:10
  • @Arne The difference need not be extremly large. Any basic LZ* method is capable of removing all the emptiness in the image, both at unused space and at unused block length, which is the crucial part. – yo' Mar 24 '14 at 09:56
  • @tohecz You are right, however if your image is rather large, that extra bit might be nice. My backup image went down from 4GB compressed to 3GB compressed, by using bzip2 instead of gzip. – Arne Mar 24 '14 at 09:58
  • 4
    @Arne I wouldn't expect such a difference! Still, that seems to be far below _my_ concerns. (Btw, it's cool when you reply to a comment almost 1 year old, and you get a response in 2 minutes `:)` ) – yo' Mar 24 '14 at 10:00
  • On my Mac, I got "operation not supported" until I unmounted with: diskutil unmountDisk /dev/disk1 – xer0x Apr 09 '14 at 05:44
  • 7
    Do not make the mistake (like I just did) of leaving the `bs=1M` or some similar parameter out. The default block size of 512 bytes will *kill* the copy performance. – Steven Lu Apr 13 '14 at 03:57
  • 1
    @Arne I tried using bzip2 now, and maybe it would be appropriate if I was backing up from my Class 4 SD card, but on this Class 10 UHS 1 SanDisk 8GB card (which was $12 last week) it is maxing out an Ivy Bridge CPU thread and limiting read speed from the card to 6MB/s (dd with Ctrl+T reports 4.2MB/s). This is not ideal because I can use gzip with this card and read off of it at a much quicker pace (dd reporting 18MB/s). Granted, if most of the disk is free space, then reading during those empty stretches will speed up. But I'll have to see what the difference is in the resulting file size. – Steven Lu Apr 20 '14 at 03:40
  • It also produced a bigger file size than the gzipped backup image. Granted various software has been installed since, but it will definitely not produce a dramatic improvement in filesize. For bzip2 to offer a 33% improvement over gzip is probably highly optimistic. – Steven Lu Apr 20 '14 at 03:57
  • It doesn't work if i have a image from 8gb SD card and want to install it in 4GB carD? What is the workaround? I am getting kdb error when the new sd card boots up. – zengr Apr 25 '14 at 21:32
  • @zengr if there is actually data on the excess 4gb then you can't copy it over this way. If not then you should be able to simply truncate the image. – Jivings Apr 25 '14 at 22:04
  • 1
    Warning if using `dd` to replicate SD cards, make sure both cards have the same size in bytes and in sectors, especially if they are of different brands or types (standard, micro). Restoring to a smaller card causes the partition table to extend past the size of the card, causing many problems or an unusable card. – drgrog May 03 '14 at 06:43
  • Please note that using `dd` to maintain backups is NOT a smart idea no matter how you do it. See http://raspberrypi.stackexchange.com/questions/5427/can-a-raspberry-pi-be-used-to-create-a-backup-of-itself for some better ones. – goldilocks Mar 06 '15 at 14:28
36

On the Mac you don't want to be using /dev/diskn. You should use /dev/rdiskn instead, where n is the number the OS uses to identify your SD card. This decreases the time required to copy by a huge amount.

So for the optimal backup process on a Mac, I would recommend doing the following:

Run diskutil list, and find the disk corresponding to your Raspberry Pi's SD card:

$ diskutil list
/dev/disk0
   #:                       TYPE NAME                    SIZE       IDENTIFIER
   0:      GUID_partition_scheme                        *500.1 GB   disk0
   1:                        EFI                         209.7 MB   disk0s1
   2:                  Apple_HFS Macintosh HD            499.2 GB   disk0s2
   3:                 Apple_Boot Recovery HD             650.0 MB   disk0s3
/dev/disk1
   #:                       TYPE NAME                    SIZE       IDENTIFIER
   0:     FDisk_partition_scheme                        *7.9 GB     disk1
   1:             Windows_FAT_32                         58.7 MB    disk1s1
   2:                      Linux                         7.9 GB     disk1s2

Clearly /dev/disk1 is my 8GB SD card, the Linux partition name is also a bit of a clue.

However, instead of using /dev/disk1 with dd, you should use /dev/rdisk1, like so:

sudo dd if=/dev/rdisk1 of=/path/to/backup.img bs=1m

And to restore it, just swap the if (input file), and of (output file) parameters:

sudo dd if=/path/to/backup.img of=/dev/rdisk1 bs=1m

Or, with gzip, to save a substantial amount of space:

sudo dd if=/dev/rdisk1 bs=1m | gzip > /path/to/backup.gz

And, to copy the image back onto the SD:

gzip -dc /path/to/backup.gz | sudo dd of=/dev/rdisk1 bs=1m

For more information, see this wiki page.

Peter Mortensen
  • 2,014
  • 2
  • 15
  • 17
Alex Coplan
  • 461
  • 1
  • 5
  • 6
  • 1
    I find this to be the most efficient answer and voted for it, thanks @Alex Coplan. – bosch Sep 25 '16 at 10:11
  • However, I was looking for a fool-proof GUI tool for MacOS (as Windows users have) and without the dd risks and I found "SD Clone" from Two Canoes (which I trust as I am a user of WinClone). It's pretty new -2016- and expensive (100$ with a 2 week trial) but seems to be geared towards RasPi so I'll give it a try right now and let you know in a new comment. – bosch Sep 25 '16 at 10:25
  • 3
    When coping back, unmount your SD Card if you get the following message: "Resource busy" – Paul Spiesberger Apr 04 '17 at 05:55
34

Besides those block-level backups, there are two common approaches to deal with the sources: to archive it continuously (1), or to use the revision control system (2).

We are going to use the command-line (any local terminal or SSH connection to a Raspberry Pi machine), right?

1. Archive

cd ~/projects
tar czvf your-raspberry-project-top-level-dir-v1.0.tgz \
         ./your-raspberry-project-top-level-dir 
scp your-raspberry-project-top-level-dir-v1.0.tgz \
         user@backup-host:/home/user/backups/

2. RCS (Git for instance)

cd ~/projects/your-raspberry-project-top-level-dir
make clean                          # Or clean it manually using rm (rm ./*.o ./*.pyc)
git init                            # Create new repo here
git add .                           # Add source files to the staging index
git status                          # Verify if it's OK
git commit -a -m "Initial import"   # Fix application's source changes
git add remote https://github.com/user/your-raspberry-project.git
git push -u origin master           # Sends the sources to your github repo
git pull && git push && git status  # Now origin/master is your tracking branch
Peter Mortensen
  • 2,014
  • 2
  • 15
  • 17
okertanov
  • 609
  • 4
  • 2
  • 3
    It might also be worth noting that people can set up bare repos on other machines on their network and push from their Raspberry Pi to there, rather than having to set up a github account, ssh keys etc and push to there. – Mark Booth Apr 13 '14 at 12:06
  • 2
    That's a good start for the real answer. Code needs to be managed under version control if one wants to be able to maintain it. Version control allows to track changes, understand history of changes, manage different branches (e.g. stable vs dev) and merge between them. But it is not backup per se. However, one simply need to backup the repository (e.g. the .git folder for Git). Check Linux/Unix forums, wikis, stackexchanges, etc. for ways to backup folders under Linux. Note: I don't consider github as backup. And you don't want to publish everything to github! – Huygens Feb 28 '15 at 20:27
30

You can run this command from your Linux PC with lots of space:

ssh root@raspberrypi gzip -c /dev/mmcblk0 > img.gz

As a prerequisite you'll need to have generated .ssh keys and copied the id_XXX.pub over to /root/.ssh/authorized_keys.

It's possible to have issues with the file system since it's a live backup, but if your Raspberry Pi isn't real busy it will usually be OK.

It's probably faster to do the compression on the PC like this:

ssh root@raspberrypi dd if=/dev/mmcblk0 | gzip -c > img.gz
Peter Mortensen
  • 2,014
  • 2
  • 15
  • 17
John La Rooy
  • 11,937
  • 9
  • 47
  • 74
  • 1
    or with sudo 'ssh pi@raspberry sudo dd if=/dev/mmcblk0 | gzip -c > raspberry.img.gz' – cupakob Nov 25 '12 at 14:35
  • and as a reference for passwordless login, http://raspberrypi.stackexchange.com/a/1687/22603 – Paolo Jan 03 '15 at 10:47
  • 5
    I also found useful to add block size and, as it was available, use pv to check progress. `ssh root@raspberry dd if=/dev/mmcblk0 bs=1M | pv | gzip -c > img.gz` – Paolo Jan 03 '15 at 14:08
  • 1
    This is a great answer if you don't want to unmount your SD card, and also works for macOS. Here's the command-line I'm using: ssh pi@raspberrypi sudo dd if=/dev/mmcblk0 | xz -9 -e --threads=4 > sd.img.xz. Doesn't require generating SSH keys doing it this way. Ctrl-T can be pressed to see the progress. – Learn OpenGL ES Dec 09 '16 at 19:36
  • Why is **gzip** preferable over **dd** command? – IgorGanapolsky Jan 25 '17 at 14:19
21

If you are using Windows:

  1. Download Win32 Disk Imager.

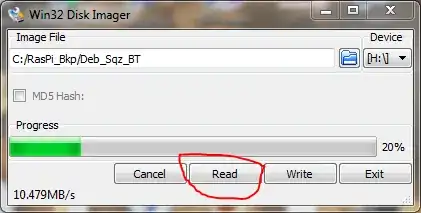
  2. Create the file path you wish to use to save your image. (I use C:\RasPi_Bkp)

  3. Run Win32 Disk Imager

  4. Browse to your backup file path spot, and type a file name.

  5. Click save

  6. Make sure the device shown in the drop down to the right of your file path is the one you want to back up.

Win32 Disk imager in Action

  1. Click "Read"

  2. Wait.

zenbike
  • 2,490
  • 6
  • 19
  • 26
11

If your programs are all in the pi userid, there's really no reason to back up the entire filesystem, as is being suggested. what I do is to just back up the single id. I run the command:

tar -czf pi.tgz *

from pi's home directory, which creates the file pi.tgz, containing all the files and directories contained there (excluding hidden files). I then scp this file to another linux computer, but you could ftp it or e-mail it somewhere for safe-keeping... anything that got it onto another computer.

This creates a much smaller file for your back-up.

Concerned about all the additional packages you've installed along the way? Create a script that will perform those installs for you again should you need to recreate your SD card, and keep it in pi's home directory somewhere. (I have a ~/bin directory for such things). Have all the commands you need to do the installs to bring you back to the position you want to be in. It documents your changes, and allows you to quickly build up a new SD card. It would contain commands in the form of:

apt-get --assume-yes install apache2 mysqld mysql php5 php-pear

Start it out with

apt-get update
apt-get --assume-yes upgrade

so that your system also is brought up to the current level before you start adding your packages.

Since this will be in your pi.tgz file, you'll have it when you need it.

Ghanima
  • 15,767
  • 15
  • 60
  • 114
Robert Nix
  • 111
  • 2
  • Note that for the Raspbmc spin-off, the apt-get *upgrade* is apparently known to cause issues. It did for me, and apparently [it's a known issue](http://forum.stmlabs.com/showthread.php?tid=2637) . – Cristian Diaconescu May 06 '13 at 16:11
  • This can be done remotely too, i.e.: ssh pi@raspberrypi.local "sudo tar -cvp ~/*" | xz -9 -e --threads=4 > raspbian.home.tar.xz – Learn OpenGL ES Dec 09 '16 at 20:06
11

I run Raspbian and use dd and cron to do automated backups of my SD card to my external USB drive.

It is a really simple solution. It runs once a week at 2 am on a Monday morning and makes an image of the SD card.

I wrote a script which shuts down services such as lighttpd and cron, to minimise the risk of the SD card being written to in the middle of the backup, it then calls dd, before starting to the services again when the backup has finished.

I've put the script and some instructions on my blog, http://www.stuffaboutcode.com/2012/08/raspberry-pi-auto-backups.html

Peter Mortensen
  • 2,014
  • 2
  • 15
  • 17
Martin O'Hanlon
  • 616
  • 5
  • 11
  • 2
    This might be a reasonable solution if you can't unplug the card. However, `dd`ing an `sd?` device with mounted partitions doesn't sound quite safe. – yo' Mar 24 '14 at 09:58
  • Your probably right, but I haven't had a problem. – Martin O'Hanlon Mar 24 '14 at 13:57
  • If you [search for advice on whether or not to use `dd` on a mounted file system](https://duckduckgo.com/?q=linux+run+dd+on+mounted+filesystem&t=ffnt&ia=web), I wonder if anyone thinks this is a sound approach? – Seamus Jan 14 '21 at 19:08
6

Fortunately the Raspberry Pi can create a backup of itself which is independent of the primary OS used to access the Raspberry (Windows, Linux, Mac). dd, tar and rsync are different tools to create backups on Linux. All these types of backups can be created by the running Pi provided it's stopping all busy tasks as mysql, smb, dlna, owncloud, seafile, apache et al before creating the backup. There is a different question where the approach is explained in more detail and a possible solution is explained here

framp
  • 902
  • 7
  • 16
6

For Debian you could use dd and tar. This would make a complete copy of your SD card and would require external (to SD card) storage, probably mounted USB or network drive.

dd if=/dev/sdd of=yourbackupfilenamehere.dd
tar zcvf yourbackupfilenamehere.dd.tar.gz

With /dev/sdd being the location of your SD card, and of being the output file name.

Peter Mortensen
  • 2,014
  • 2
  • 15
  • 17
  • This has the limitation of needing somewhere to write the image to though (that is also large enough to take the image(s). Presumably it also means a large data io through the usb hub - would take a while? – Jon Egerton Jul 05 '12 at 10:38
  • True, but it's kind of required in the question: "I want a full image of the SD card." – Forkrul Assail Jul 05 '12 at 10:39
  • 1
    Why do you make a `.tar.gz` file of the dd-file? Wouldn't it be better to just run `gzip` or `bzip2` on the dd-file directly? – Anders Jul 25 '12 at 21:11
  • What does **/dev/sdd** mean? I have `/dev/mmcblk0p1` and `/dev/mmcblk0p2` listed... – IgorGanapolsky Jan 25 '17 at 14:20
4

If your Raspberry Pi is connected to a network and you want automatic on-the-fly backups, probably the easiest way is Bittorent Sync - very easy install and running smoothly and stable on the Pi and many other platforms.

Peter Mortensen
  • 2,014
  • 2
  • 15
  • 17
ir11
  • 85
  • 4
2

No more scary dd, sync, tar, ..., beginner friendly SD Card Copier

The new version of Raspbian called stretch has a very beginner friendly app called SD Card Copier. You don't need to use the Linux tools such as dd etc. It can even copy big cards to small cards.

How to do it

You start with the GUI RPi app menu icon at the very top left corner, go to Accessories, then click SD Card Copier.

All you need to do is a couple of clicks inside the GUI!

After you make the backup SD card, you can use Windows Disk Manager to read the card's image to a Windows file and store it in any Windows directory. This way you need only a physical SD card and store many versions of images in the Windows PC.

Of course you can just use the backup card as the working copy, to replace your original card, which now becomes your master card, and lock it in a safe place.

tlfong01
  • 4,615
  • 3
  • 10
  • 24
1

The OP asks two questions. The "headline" question is, "How do I backup my Raspberry Pi?"; the second question is, "How can I backup the files I have created?". The second question strikes me as ambiguous because it doesn't mention files that may have been modified (e.g. the many files in /etc); these modified files are frequently more consequential than files actually created from scratch.

However, there's little need to fret over this ambiguity as there are one (possibly two) answers that cover both questions; both answers are rock-solid with years of proven, reliable service to recommend them. Here are those answers:

For the "headline" question, How do I backup my Raspberry Pi?:

Perhaps the only answer, but almost certainly the best answer is the image-backup utility developed by RonR, and posted to this RPi forum page - where it is also supported. image-backup was released a bit over 4 years ago (Aug, 2019), and RonR still faithfully supports it, answering some questions repeatedly without rancor.

image-backup is the best backup solution because it was well-designed, and nearly flawless in execution. It has not been updated in more than a year (last I checked) because there are simply no bugs remaining!

  • Fast: 3min:55sec elapsed time to create a bootable image of RPi 4B from a 64GB SD card.

  • Efficient: The image file contains only actual data on SD card - not the entire partition (à la dd); 64GB SD card -> 4.05 GB file.

  • "Live" backup: Backups are done on a live, operational system; no need to shut down the system, or unmount the device.

  • Image file: *.img file format supports x-easy restoration; simply write the entire file to an SD card. *.img format also supports RPi mount, allowing partial restoration/comparison against current SD card.

  • Ease of use: One simple command (image-backup) invokes creation of a full backup; prompts are issued for other parameters. Also supports an update feature for existing image files to pick up any changes made since last full backup.

I feel RPi users are very lucky to have a backup solution that is not only FREE, but rock-solid and simple in use.

For the secondary question, How can I backup the files I have created?

Certainly image-backup will do this backup. However, rsync can also do this. rsync is another exceptional, rock-solid program, and in fact image-backup uses rsync internally - it's one of the reasons image-backup is so fast and efficient!

rsync definitely has its uses, but one potential tradeoff is that rsync is much more complex in use. It has a large number of options, many of which are inter-related, and even experienced users are frequently challenged by these. IMHO, rsync really shines when doing inter-system backups/file transfers; e.g. from a Mac to Linux, across differing file systems, etc.

And that's it; two questions with a single answer - or two answers if your needs run to backing up across file system boundaries.

Epilogue:

This is an old question. It was asked in June, 2012, but remains quite valid today. Unfortunately, some of the answers have not aged as well as the question. For example, the selected answer, which is to use dd to create a backup, is simply no longer valid - if it ever was. It can be fairly stated that dd is not a backup tool at all - for several reasons.

Seamus
  • 20,552
  • 3
  • 31
  • 67
1

While searching to create an image of my customized SD card I found this post. The best answer here discusses imaging the SD card, but what I was looking for required shrinking down the filesystem to make the image as small as possible. I ended up creating my own tool to do this and outline the process at: https://raspberrypi.stackexchange.com/a/37899/32585

berto
  • 1,201
  • 1
  • 9
  • 12
1

Here are 3 options:

  1. In the latest version of Raspbian, there is a tool that converts your OS and files into a .img file that you can then place onto a USB, or your PC.

  2. Plug your SD card into a Windows PC, and start up Win32 Disk Imager (install here if you haven't already.)

    In (1) type a filename & location for athe image file. In (2), select the drive letter of your SD card. Then press 3. This does the same as option 1.

  3. Plug in a USB stick to your Pi, and copy any important files across.

goldilocks
  • 58,187
  • 17
  • 111
  • 227
Oliver
  • 85
  • 1
  • 1
  • 9
0

This android app will read an SD card into an .img file, and zip it at the same time: https://play.google.com/store/apps/details?id=com.redrobe.raspicardimager

Mike Redrobe
  • 951
  • 7
  • 13
0

I created a utility to backup your raspberry pi if you are Linux. This will also shrink the image of your raspberry pi, so you can put the .iso on a smaller SD card: RaspberryPiShrink

This will run a python script that will walk you through the process. Just plug in your microSD card into your Ubuntu, Linux Mint or Debain computer, and follow the in terminal instructions.

Audstanley
  • 99
  • 1
  • 5
-2

I've been using usbit for Windows. It's the only tool I can find that will allow you to swap from a larger SD card to a smaller one. All I did was tick the following on the options page; Ignore size checks and Truncate oversize images.

This allowed me to swap my OpenELEC and Xbian images from a 16 GB class 4 SD card to an 8 GB class 10 card.

It's MUCH easier than resizing partition tables, etc.

Peter Mortensen
  • 2,014
  • 2
  • 15
  • 17
Craig
  • 39
  • 2
    Have you ever verified the files? I mean with `find -type f -exec md5sum {} \; > filelist.txt`? – Avio Oct 05 '12 at 22:16
  • 2
    This is not guaranteed to work, as data stored on the second half of the disk is dropped. Furthermore, the partition table is corrupted. – Alex Chamberlain Oct 06 '12 at 09:22